Nov 17, 2017

Bad Runnings

It smells like gas at my kitchen table, not the fart kind. I blame the carb in pieces next to me.

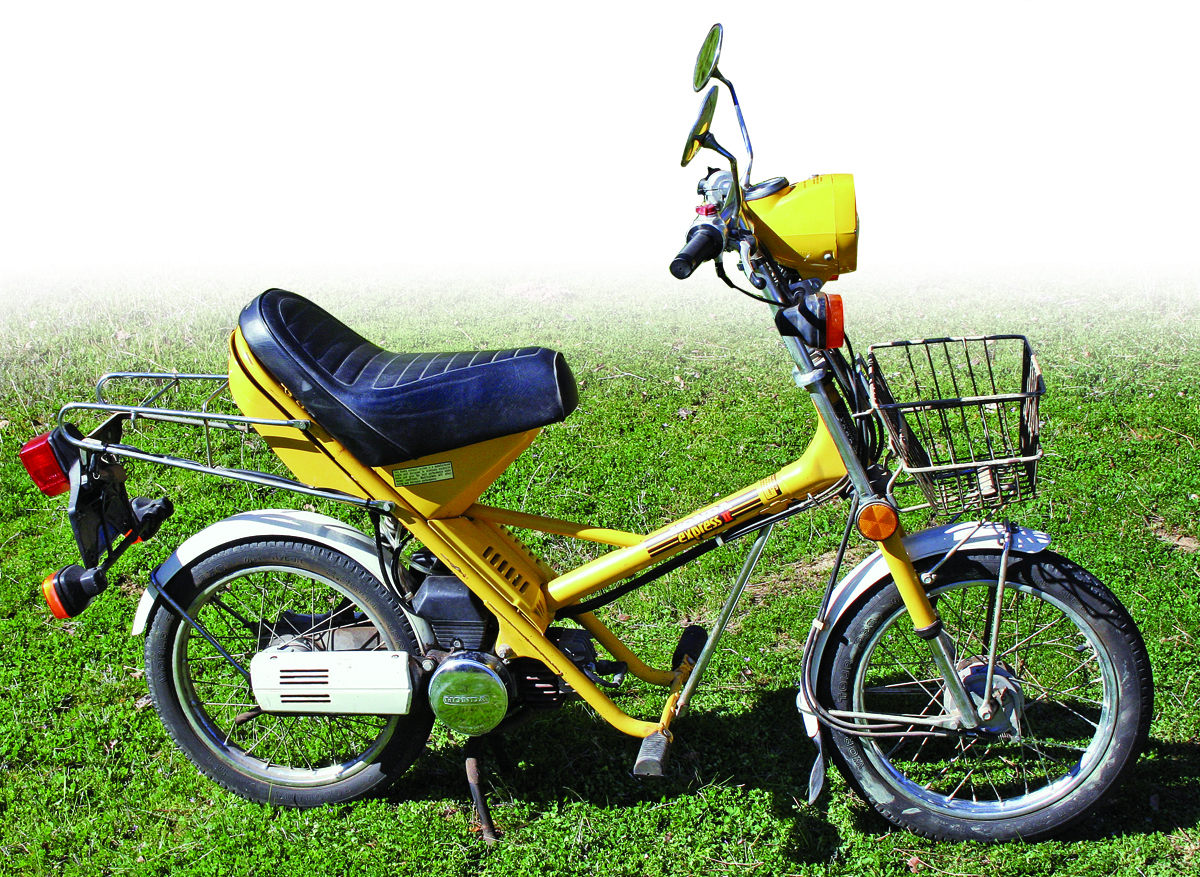
Since the last episode, I sorted the wiring harness a little bit, adjusted the points and replaced the gas tank. I bought a motorized bicycle tank from my buddy Greg and strapped it to the main tube in the front. I ditched the old tank because of the chronic pinholes and the patches I made with the JB weld were going loose. I probably could have used some tank sealer in addition to the JB weld and had a leak free tank, but I don’t really know what kind is good and it’s easier to just slap this rust/leak free tank on and be done with it. It also makes the bike look a bit better without that rack on the back. I moved the tail light to under the seat and the bike looks a bit more like a bobber or something.

I also had to put on a new spark plug boot because some shit clown cut the old one off the scooter while it was locked up. I cannot even. It had been chewed up by my old roommates cat and was covered in electrical tape to minimize shocks. It would still get you sometimes even with the tape. It was crap and someone stole it, I can't figure out why. I bought it new for I think $3. It makes my head hurt. Whatever. The new one is an upgrade. I hope no one swipes that one and if they do, I hope they have the decency to not cut the wire on my coil any shorter because I don't think I can easily replace it.

The big news is that I got it to run, very badly, but it runs. I even rode it around the block, twice! It runs really erratically and revs up real high sometimes without throttle input and then other times it doesn’t even want to idle and will just die without blipping the throttle. It also seems to bog down at full throttle. I’m pretty sure I could outrun it at full throttle. I’ve been trying to figure it out and I think it might be “four stroking” where it’s not firing every other stroke, but skipping an extra cycle in between. I guess adjusting the mixture is supposed to fix that. I didn’t find a good explanation as to how to do it though. More research on that is needed.

I saw a youtube video of someone pulling out the idle jet tube to clean out some holes at the top. I carefully got mine out with a pair on some pliers. It doesn’t have any holes at the top in the side of the idle jet tube when you pull it out with pliers, unlike the video. Supposedly if these holes are a common clog/clean/fix situation, but it’s not the case for me. Pulling it out is going to let me get it extra clean though. I’d love to pull out the main jet and clean it, but I can’t seem to figure out how to press out the main jet. I might go grab some pipe cleaners and see if those help.

I have a carb rebuild kit that I bought from treats and it seems to have extra parts and maybe not have an exact fit. It seems like the Honda Expresses had a different carb every other year and even different carbs for the same year. It’s a third party (non-OEM) kit so we’ll see how it goes. It had fun 80’s-tastic packaging though so I’m pretty optimistic. 

The carb on my 1980 Honda express NC50 says “PA08BBRI” and then has some marks that look like the Atari symbol but missing some lines. I found a page on Myrons Mopeds that seems to have some relevant info.

Float needle valves are different between P08BA and P08BB. I might have the wrong one in there.  Honda part no. 16155-883-005 is the one I’m supposed to have in there according to myrons mopeds. I have something in there that looks more like the other one for the P08BA carb, honda part 16011-881-741, called the stirrup version, as opposed to the regular one in the PA08BB. I don’t know if it really makes a difference though. The rebuild kit came with one that looks like the right one for my carb.

It also looks like I’m supposed to have a different float. I have a black plastic one in there now but I guess I’m supposed to have a yellow hollow plastic one in there. I wonder if the float and float needle valves go together. Hmmm.


May 18, 2017

Video intermission

The engine holds torque and is in all one piece... but the bike won't start. I have a feeling my wiring is at fault. I'm going to pull out my secret kill switch because I think it might be weakening the spark. I also disabled the oil injection so I don't have to worry about the tank not keeping the fluids separate. I think my premix might be a bit off right now, but some extra oil on the rings might not be so bad.

We'll see how the wiring harness editing goes.

Until then, here's something that gets me stoked that I saw on Jalopnik the other day.


Mar 21, 2017

Stripped and Leaky

My little Honda Express NC50 still sits in my kitchen with its engine in pieces. I'm sick with some kind of cold/flu/phelmpocalipse. The helicoils didn't hold in the bottom left (bikes left) hole and stripped out my brand new engine stud.

So, I dabbed some good ole JB weld on the stripped out helicoil hole and I'm going to try to tap and coil it again. I'm hoping that will be enough for the coil to hold.

Also, I'm going to switch to the older style engine studs. The newer ones are just bolts that go through the head and cylinder and screw into the case. Every time you pull the head you have to undo and then reinstall these screws into the case. Everytime you do this is an opportunity to chew up the threads in the case. When reinstalling, the head, 2 gaskets and cylinder are in one hand while the other hand is juggling and installing these 4 long screws to hold the whole thing together. This seems like a great way to crossthread those screws and have to helicoil.

It seems like most other engines have studs that are like a threaded bar that screws into the case and then the cylinder, gaskets and head slide onto these studs and then nuts and washers tighten the whole thing together. This means the stud/engine case connection is messed with less and the helicoils probably stay in more securely.

The 1977 Honda nc50 parts sheets have regular style threaded bar type studs while later models, including my 1980, have the bolts that seem to want you to ruin the threads in your case. I'm wondering why this changed. The older ones had nuts and washers at the end of the threaded bar so that's three parts for each stud and there are four so that makes 12 parts. The newer style ones just have the four bolts. Maybe it was a cost saving, simplifying thing.

I'm slightly concerned the stud change might be a servicing thing. There's a bar between the footpegs that's right there by the head and I hope it wouldn't get in the way when putting the cylinder and head on the threaded bar style studs. I wonder if the old style setup required removing the engine from the frame to mess with the head etc. I guess I'll find out. If I have to pull the engine to make it happen, then that's just what I'm going to do.

Also, the tank doesn't seem to be keeping gas and oil separate. The gas turned blue from the synthetic 2 stroke oil, and the oil, smells like gas and seems very thin. I think my short term solution will be to just plug/loop the oil injection and run it premix. A long term fix might be a tank sealer kit, but I'm not sure how big the leak is. Maybe I'll be getting a new tank. I've always liked the idea of getting rid of the rack and tank setup on the back and putting something on the backbone or top tube or whatever you call it. I'm pretty sure it'll run on the mix I have in the tank right now, even though the mix is really heavy on the oil. I'm going to solve the engine stud problem first and worry about the tank later.

Shopping list:
Older style engine studs/nuts/washers
Blue locktite for the studs
Exhaust crush gasket
Maybe a torque wrench
Perhaps some feeler guages

Nutting (and Bolting)

This is good, I should do this to all my bikes.

Mar 12, 2017

I Jinxed Myself


I've been telling people about how I'm so close to getting my moped running and I'm pretty sure I jinxed myself. I finally had some time to spend cursing at the Honda and of course I found as many problems as I fixed. 

First fix was pretty easy, the pinhole in the top of the gas tank. I had intitially patched it with a piece of bubblegum because according to a the friendly youtubing Canadian, AvE, gum is made from a petroleum resistant food grade plastic so it would be perfect for the job. Turns out, it doesn't work, it just kind of melted. Maybe Canadian gum would work better. 

No matter though. The quarter I used to seal the leaky oil sight seems to be holding up great, so I just JB welded a dime over the pinhole on the top of the tank.

The main project was making the engine stay together nice and tight. I got new engine studs and helicoils in the mail the other day so I was ready to fix the stripped out threads in the crank case. 

When I opened the case, a bunch of water came out. No good. Where did this crap come from? I contemplated this while I installed helicoils in two out of the four holes. Each one took a couple tries and the top right (the bike's right) has two helicoils stuffed in there. The bottom left one had to be drilled a bit more and neither were drilled very straight (Not my fault! It was the other guy that worked on it before me)

So now I have good threads in a case that had a bunch of water in it. I'm trying to soak up the puddle with a rag and then spray some compressed air and wd40 in there and hope for the best. I tightened the oil pump, maybe that's where the water came in? Maybe it was the loose studs?

I'm glad that hole in the tank is patched, but looking at the fuel lines, I'm wondering if the two parts of the tank are still sealed off from each other. There looks like there's a whole lot of oil in the gas line. 

The bike is still in parts in the kitchen, so I guess my next step is to try to dry and reassemble the engine and see if it'll fire. Then maybe try to figure out it the tank is keeping the oil and gas separate. Maybe I will be buying a new tank and premixing. 

Or maybe I'll just throw the godforsaken bike into the river because it seems like my bike hates me. 

Mar 6, 2017

Hella Coils

I hope I'm better at installing these things than the previous owner. Hopefully they'll hold. I'm not super optimistic. This bike doesn't seem to want to run and the other person that worked on this before me is just as bad at working on engines as me, if not worse. I really hope this works. 

I'm just waiting on the engine studs. Partmonster or whatever website I ordered them from said they should be here Wednesday. I'll let you know how it goes. 

Mar 2, 2017

One Step Forward Two Steps Back

I brought the 'ped inside today to see if I could figure out how I could keep this engine together tight enough to hold compression and run (see previous post for details of stripped engine studs). While dragging it's lifeless body in from the street, I noticed not only was the carb still leaking (I have to remember to get some gaskets to hopefully solve that problem) but there was also a pinhole leak in the tank right by the gas cap.

Welding the hole shut would probably be the ideal solution... even JB welding it would be pretty ok (I JB welded a quarter over the leaky oil sight window previously) but, whatever. I just chewed up some gum and smushed it over the leak. Oh god how this bike must hate me.

I can tell it hates me. It should, I've done little other than fool with it and fix it poorly, and I've taken way too long to do what few shoddy repairs to it that I've done so far. This bike has a history though. I've learned a bit about it today. The engine case has been heli coiled. Not only did a previous (more than one, I assume, I don't know how many) owner cook the wiring harness by welding a coil mount under the seat, the case was drilled and heli coiled.

This is the root of my problems. Fucking Heli coils. I bought a tap/die set from Home Despot in hopes of cleaning up the threads and having everything work out. Did it work? Hell no!

Instead of chasing some M6 x 1mm threads in the case, I ended up removing the heli coil. Also, it's been drilled out so much that I can't tap it to a 7mm thread and just use oversize engine studs.

I guess I'm going to try to heli coil it once more. I have to look up the whole helicoil thing first.

Whenever I think I've fixed one thing on this hunk of junk, I find two more things wrong with it.

Feb 20, 2017

Failure to launch


Fuck! It doesn't run. I filled it up with gas and it won't fucking start. I tried so many times. Only once, it made one good "pop" like it was about to fire up.  One tantalizing moment to get my hopes up and then nothing at all. What a tease. 

I pulled the plug, and held it next to the engine and yes, it made a spark. It was also slightly moist, so I'm pretty sure fuel was getting to the engine.

The equation is fuel, spark and compression combine to make a running engine. The last piece of my puzzle was compression. 

As I was kicking it over, I thought I saw something come out the side of the engine. I crouched down in the gas station parking lot and put my hand next to the engine as I tried to start it a few more times. I could feel a breeze coming out of the side of the engine, right where the head meets the cylinder. The engine wasn't holding pressure. No compression. Fuck me!

The whole time I was working on the bike, I was always suspicious of the compression. I hadn't sprung for a gauge so I gave it the "thumb test". The thumb test make might be different for other situations, but on an engine, you pull out the spark plug, hold your thumb over the hole while you crank the engine over and hold the throttle open. It should blow your thumb off.  I could feel it making something, but it didn't really push my thumb off. I chalked it up to having strong hands and told myself it's probably fine. 

Apparently, it's not. I walked the Honda Express home (tried to bump start it on the little hill on the way back from the gas station in a moment of hopefulness) I tore down the head when it back in my living room. My living room reeks of gasoline now. I'm amazed my girlfriend how puts up with me. 

When I got it open, I cleaned the head gasket and the faces of the head and the cylinder that it touches. When I tried to put it back together, the bottom left engine stud wouldn't thread in. Even with 3 other studs in there, the last one wasn't grabbing. It just wouldn't fucking go no matter how much I fucking swore at it. 

I pulled the stupid thing apart again and this time in my rage induced careful inspection, I noticed the threads on the studs were fucked. 

There's you're problem! It looks like the threads in the engine case that the studs screw into are fucked up too. Not as bad as the screws, but they don't look so hot. I'm going to have to deal with them. I wish I could just order some new studs and make it work. Maybe that's what I'll try first. 

I think I need to drill it and tap it. I might be able to use a heli coil, but I really don't know much about those. 

I'm also concerned that I might need a new head gasket because this one had been installed and removed a bunch of times. I guess I should worry about the studs first. 

Speaking of gaskets, I'm also going to be shopping for a carburetor rebuild kit too, because it's leaking gas. Maybe it's good that it didn't start because it might have caught fire. 

So it's not running. I thought it was ready. I even bought a helmet the other day. So close, yet so far. The helmet is dope though. It's a Bell Mx-9 Adventure. I got the white one so it makes me look like a storm trooper.

 Dammit, I'm pissed at these engine studs. So close, yet so far

Feb 18, 2017

Wired and Farts

Tonight, I did all the wiring I'm going to do. Lots of crimp connectors made it happen.

Here's the rundown:

Brake lights should get brighter when the lever is pulled*

The horn is hooked up. I know the horn is good because I hooked it up to a random D.C. power and it beeped. It's got a cute lil beep.

Front and rear lights should work. The high and low beam switch is even hooked up.

The kill switch and the secret disable switch are wired up.

What's left:

Do something about the dangling wire pasta. It seems like it'll get caught on something. Zip ties and/or electrical tape should take care of that

Tape up the seat. I'm pretty sure there's some gaffers tape around the apartment.

Put the headlight back in, and make it slightly more secure.

Get that right hand grip all the way on. Maybe even put the matching one on the left side. Those yellow oury grips are going to look great. The yellow totally matches the yellow in the Honda Express logo

Optional Stuff:

Measure the clearance for those shinko tires I've been eyeing. I hope they aren't too wide. Those fat knobby tires would look killer and I'd love to do a bit of bandit off-roading around the city. I'm not sure where my calipers went to, but they would work really well or this type of measurement.

Wire up the right hand switch for the brake lights. I tried to solder a new wire on earlier, but it came off. I might have to buy a whole new switch. Or I could just not give a fuck.

Install the speedometer cable so I can know how slow I'm going.

Wire up those blinkers. I think if I do any more wiring, I'm going to get a terminal block. At the very least, I'll need some more connectors. I also need a flasher relay thing if I want them to actually blink.  I might just ignore the whole blinker situation and hand signal.

I've also been thinking about a bar swap, but that might create more issues than I really want to deal with. Still, I think a pair of chrome motocross style bars would look way better than the stock awkward ape-hangers.

A fender between the rear wheel and the engine/hoses and wires seems like it would be a good idea. Maybe, I can find an old license plate on the side of the road that I could use.

Install the oil seal under the second piston ring. This should give me better compression and thus more fasterness. It doesn't look big enough though. I  might just leave it out. It'll probably be ok, right?

Stuff I'm worried about:

The bike doesn't have the stock air box/filter on it. I packed the high flow mesh filter with foam, so hopefully the tune won't be too far out of whack but I suspect it's going to get too much air and run lean.

Speaking of air, I need some of the fresh kind. I've been ripping so many horrible, rotten farts all night. I'm so glad my girlfriend went out with a couple of her friends so she wouldn't hear/smell my ass. What the hell did I eat that's doing this? They're loud and they totally reek. I've been laughing at how bad its been all night. I'm surprised the cat isn't dead.
 Most of the time, it's one or the other. I'll have loud but relatively non-stanky farts or silent but deadly ones. Tonight's not normal, they're loud, frequent and noxious. I wonder if it was the steel cut oats I had for breakfast or maybe the snacks from the Asian grocery store yesterday.

Ugh, there goes another one. I'm dying. I'm laughing and crying. It smells like something died in my ass. It sounds like some kind of brass instrument dying. Good god.

And on that bombshell, good night.

Feb 12, 2017

Stranded Copper Spagetti

I think I just made the worst wiring harness ever in the history of motorbikes. Good god, I feel dirty in a strange way. Kind of like right after eating a pile of fried food or doing some freaky bedroom stuff. I feel disgusted with myself, but also satisfied and I'm glad I did it.

It's my first wiring harness, ever, so I should theoretically improve each time I do this. It's only up from here!

The abomination I'm calling a wiring harness isn't even done, though. The running lights are hooked up, the high and low switch should work for the head light and the kill switch works. The brake lights aren't hooked up  and one of the switches for the brake light in the lever is real messed up and I don't even have a blinker relay for the turn signals to make them flash. I might just do that manually with the switch... or just skip the whole thing. I did use the multi-meter to check the bulbs and circuit in the turn signals and I'm pretty sure they're good. Either that or nothing electrical on the bike works and I've been using the multimeter totally wrong. The chances are probably 50/50.

I do definitely want to hook up the horn though. I hope it sounds like roadrunner. Meep Meep! The bike def won't move like roadrunner but I hope I at least get the noises.

I think I've done enough to keep myself from getting pulled over too quickly, which is the main goal, besides making it run.

Perhaps I'll post my crudely hand drawn wiring diagram when I'm done. It's going to be ugly but it'll probably be easier to understand than the one in the Honda shop manual. I wonder who over at honda thought it was a good idea to make a diagram of more than a half dozen different colored wires printed in only black and white. Wiring diagrams are confusing when they're in color, but making a black and white wiring diagram is brutal.

The next thing I have to do, other than try to take care of some of those dangling wires, is check the transmission fluid situation. I'm still not totally sure which screw to pull in order to drain the thing, but I'll pull screws till I find the right one.

I guess that's it for today.

Feb 10, 2017

Wiring and Roundeye Makes Congee

I'm starting to get a hang of this whole wiring and electricity thing. It no longer seems like the dark art of wrangling angry pixies. It's making more sense to me and I feel more like I sort of know what I'm doing.

Before, I had the stator hooked up directly to the coil. That let me see a nice blue spark when I spun it up, but if the bike actually ran, I'd have no way of shutting it off besides the petcock, and this thing probably runs forever on a couple spoonfuls of gas. Today, I actually wired up the run/stop/run switch on the bars. I got to use my fancy connectors that I ordered from treats and I dipped everything in marine grease in hopes that the corrosion demons will leave my wiring alone.

I had a bit of an electrical epiphany today. I learned long ago that electricity follows the path of least resistance to the ground and blah blah blah. I passed the tests and all that, but it's a whole different thing when you see a working example in the real world. The way the kill switch works is not by breaking the connection from the stator to the coil/spark plug. It actually just provides an alternate and easier path to the ground. Rather than do all the work of going through the coil and spark plug, the current takes the path that has way less resistance and goes right through the regular copper wire, through the switch on the bars, right to the ground, nothing slowing it down. When that switch is flipped, the easy path to the ground is shut and the current has no choice but to go through the coil, to the plug and make a spark. Definitely more resistance on that path, but with no other option to get to ground, that's all it can do.

This is great because now I have an easy way of turning off the engine before it runs out of gas.

There is no key or ignition on this bike so, I added a second kill switch in a somewhat hidden place in hopes that people won't be starting it while it's locked up in the street.I wired it inline, right before the coil so I hope this doesn't mess with anything involving the spark. I'm sort of worried I'm making things too complicated. Also, the switch is for AC stuff, so I'm not sure if it's a great idea having half of it wired up inline like that. I guess I'll find out. It won't be too hard to fix, I did leave myself some extra wire.

Also, while I was getting into it, I shortened the fuel and oil lines a little bit so they are a little further away from the rear tire. They're still real close though. I think I'd like to put some sort of fender in there at some point, or maybe cover the hoses somehow. If I mounted the tank on the cross bar, I wouldn't really have that problem anymore.

I also scrounged up some hardware to let me take the old airbox bracket off. The bike never came with the stock airbox so it was nice to take it off the bike. It was threaded and held the carb in place, but a couple nuts and washers from my stash hold the carb now.

I used the multimeter a bunch today. I checked continuity the whole time I was setting up the kill switch and then I also used it to check that the left brake lever will actually be able to make the brake light come on. When you pull the lever, it closes the circuit. When let go, the lever opens the circuit. The right side lever has a broken wire, not sure how I'm going to fix that. Maybe some soldering will need to be done.

At Home Despot, I found some cotter pins. I know the bike probably wants something metric, but the 3/32" ones fit fine, if a little loose.

Playing with the lights, I figured out the general scheme of things. The yellow wire is the running light, the red wire is the bright or brake and the black wire is the ground. So now I just need to bolt the lights and regulator to the bike and wire them up.

After the lights, I want to change the transmission fluid and then I should be good to go. I mean, the turn signals don't work, the tires should be replaced, the seat is torn, the horn is at the bottom of the parts box and there's probably other things horribly wrong with the honda express, but whatever. Those are just details. I just want to ride.

In other news. I made congee for the first time. I put in dried shrimp. I like it.

Jan 9, 2017

Tranny Oil

So I found a manual for the Honda Express NC50 on the mopedriders.org site, which is great because  I wanted to know what sort of oil I should put in the transmission case. The manual specs 10-W40.

Great, but hold on a sec. I had a vague memory of hearing that car and motorcycle oils are different. Further research revealed that this is very true. According to the stuff I read  (totally credible...probably) motor oil for cars doesn't have to lube the transmission, just spinning engine parts. Motorcycle oil, on the other hand, lubricates the transmission as well as spinning engine parts. The motorcycle's clutch is getting bathed in this oil, and it has to grip when things are in gear to transfer power from the engine to the rear wheel. The motorcycle oil has to balance the slip with the grip. The stuff in cars just needs to be as slippery as possible, the transmission has its own separate fluid situation. It seems like putting automotive stuff in your bike would mess with your power transfer and probably make your bike slower.

If you read the comments on this article, I think some people have gotten into this situation. They said after they changed the oil on their Honda Express, it was slower. Most of them seemed to be using oil meant for cars (some even said they were putting in mobil1) and so they're probably getting some extra slip on the shoes in their centrifical spring clutch.

I mean, I think that's what's happening, I'm no expert mechanic, but I think I figured something out. I also realize that I bought a quart of the wrong stuff a few months back. At least I didn't put it in just yet.

...

Wait... I kept digging after I wrote this first part and saw something on the honda rebel forums that said car oil is fine as long as it doesn't have certain additives. I don't know how much I trust Honda rebel forums. First off, forums are not always super credible. Second, Honda rebels are lame bikes.  Actually, I shouldn't really say anything. All I have is a non-running noped, but I still don't trust forums.

...

Okay, so after getting pretty nerdy and reading about wet and dry clutches and shearing viscous chains, I'm still going to use motorcycle oil instead of automotive oil because I think my clutch will slip less and lose less power.

Rear brake is good now!

Now the rear brake works!

Today, I pulled off exhaust so I could get the back wheel off so I could put in the new pads.
The exhaust studs are funky. One comes out of the engine completely. On the other one, the nut just comes off. They tighten down okay, so they'll hold the exhaust on, right? I hope so.


It was cool to see the back wheel off and I'm pleasantly surprised that I didn't really have to fight with any stuck parts to take it off. It was need to see that it's just a splined axle driving the rear wheel. Definitely a different setup than the bicycles I'm used to working on.


There are also a couple of kinda sketchy marks in the side of the hub. I'm not too worried but I'm going to try to keep an eye on them.


Looking at the old pads, they didn't seem bad at first, but then on further inspection, I noticed one of them had some grooviness to it so I guess it's not a bad plan to replace the pads.


So I wiped out dead spider pieces (I actually found crumbly bits of spider in there, no joke) gave the drums a light sanding, cleaned the drums with isopropyl alcohol and put in the new pads. The drum has 80.5mm stamped on the inside. The front one said the same thing if I recall correctly. It's nice that the 1981 Honda express nc50 uses the same shoes front and back. For those playing along at home, I put in Honda part number 06430-131-405.


I'm refining my technique with the springs. To pull them off I stuffed a screwdriver under the spring pointing up towards the middle of the upper brake pad and pried up and that popped the spring off the boss. Then I got the spring out of the slots with a pair of pliers. It's sounds really easy but there was some cursing and frustration. It did go easier than the front wheel, though. The pic below shows where I did the prying. I took it right after I popped the spring off the boss.


Getting the spring on the new shoes wasn't as hard as the front wheel was either. I put the shoes on the bike, then put the spring in the holes in the shoes and pried the shoes open (like when the brake lever gets pulled) and used the pliers to push the spring over the boss by clamping against the spring and the bottom shoe. I bet I'm not conveying this properly through words but I basically put the pliers around the spring and pads right next to the boss and squeezed the handles. At the same time opposite the boss I had a screwdriver wedging the pads open (opening the pads seems to give you more slack on the spring). Hopefully the pic below will help. If that still doesn't help, leave a comment and I'll try to figure out a better way to convey it to you. Or just leave a comment if it worked. I'm going be surprised if anyone leaves a comment actually.


After the brake work, I swapped out that spring for the correct one on the end of the choke cable (mentioned the other day) and I guess it's better. I mean, I don't think it's any worse. Below are the two different springs. The longer, thinner one is the one it was supposed to have in there.


While digging around, I found a strange mark on the transmission case. I wonder if it's something about the casting. At first I thought it was a plug for draining the fluid but there's already one right next to it. It's out of view in the picture, but I assure you it's there.


I also still have to go get some cotter pins. There's an empty hole on the back wheel that I know should really have one in there. For ya know, safety. So the wheel doesn't fall off. I do feel good about having the one used cotter pin on the front wheel though. I'd actually rather lose the back wheel than the front. Losing the front means probably going ass over teakettle and really bad things. Losing the rear wheel seems like there'd be skids and sparks and probably a good laugh after the shaking went away. I hope I keep both wheels on though, so cotter pins are on the shopping list.


I also cleaned up the dead spider bits and brake dust before my girlfriend got home so I look like a ninja mechanic. I'm already repairing my Honda express in the kitchen/living room, I don't want to mess up the good thing going on here.

Next on the list is lights/electrical. When my lovely girlfriend got home, she asked me if I thought I was 75% done and I hesitated. Every time I fix something, I find something new wrong with the bike, but I think I could agree with the bike being 75% ready to go around the block. It still needs a bunch of stuff, but if I can get some working lights on there and make sure it sparks and make sure I can make it stop running when I want, I'm going to be pretty stoked.


I'll let you know how it goes.

In other slightly related news, I talked to a dude on an electric scooter with a Vermont plate the other day while stopped at a light on my bicycle. Apparently, that rumor that Vermont will register anything is true. I was excited to see it in real life and not just hear about it on a forum somewhere. I'm going to keep that as a backup plan if the NY DMV doesn't work out when I try to get this thing legit papers so as to be not riding dirty. 

So the next phase is the electrical. I have a multi meter, a color wiring diagram (that black and white one is cruel) a regulator/rectifier, a headlight, taillight, a spool of wire, connectors and a soldering iron. Fingers crossed. If anyone read this far, wish me luck!

Jan 5, 2017

We Have a Working Font Brake!

The battle with the Honda Express NC-50 continues.

Now there are new pads inside the drum brake on the front wheel and I cobbled together a combination of new cable and old adjusters from the original (frozen) cable to make something that works... mostly. The end is held on with a knarp, so it's slightly sketchy, but I'm going to go with it.

The spring on the brake pads was the worst part. Getting the old spring out and the new one with the new pads was a huge pain. When I was looked the brake install up before, some people said they just used pliers, others said they put the spring on before the put the pads on the hub and others said they used a screwdriver to push the spring up over the post after it was already in the holes.
Reference pic:


I did it a little bit differently, I put the spring through the holes in each pad and got the pads on the post on the hub. I still needed to get the spring around the post. After using up my library of cuss words, I figured out I could get the spring closer to getting around the post if I opened the pads up by pushing on the brake arm. I put my big ole prying screwdriver, that I found in the street years ago, into the gap behind the brake arm thing and pushed the pads even further apart. I also angled the pads up off the hub a bit and used the handle of a screwdriver to push the spring over and onto the post.
That description makes it sound easier than it actually was and I left out all the cuss words so little kids can learn how to fix the mopeds they might or might not be able to legally ride.

The rest of the brake job was pretty straightforward. I cleaned all the junk out of the hub and even tried to sand it a bit. It didn't really clean up that well, but it seems to work okay when I test it with my hands. I hope these words aren't foreshadowing my death by under powered scooter.
I think I'll be fine though. I even cleaned the fresh pads with rubbing alcohol to make sure none of my filthy hand grease would compromise breaking power.

The most sketchy part of this repair is the brake cable. Apparently Honda uses sort of odd brake cables because the "universal" brake cable I ordered online did not have the girth or adjusters to work. I also ordered a "NOS honda express front brake cable" from that popular online auction site. It had the right cable ends and the right hardware, but this one was too short. Call me Goldilocks. Maybe I got one for an Urban Express NU50, an Express II NA50 or even an Express SR NX50

So I fabricobbled something together. I chopped up the old brake cable to get the adjuster I needed at the end of the cable, which was a challenge due to the highly rustified nature of the cable. Then I clipped the end off the not-so-universal brake cable so I could apply aforementioned hardware. Then I stuffed the whole melange of parts onto the bike and topped off the end with a knarp. It took a few adjustments to get the tension right, and the brake doesn't snap back all that nicely, but it does seem like it could stop the bike, as long as the knarp holds strong.

I'm still quite sketched out by the knarp, because the first couple of times I adjusted the brake, the cable slipped through the knarp. On the final adjust, I gave it some good crankage with the screwdriver and ratchet, but I'm still not totally confident. Hopefully it's one of those things that I'll worry about less and less as time goes on. Also, I hope it doesn't actually go wrong and try to kill me. I like to think that I'm pretty lucky though, so I'll probably be fine. Hey, I'm worrying less already!

The other thing I sort of fixed is the choke. It's now hooked up to it's rightful place on the handlebars using a grab bag of screws and washers. It doesn't seem to want to move around super nice, but I think it moves enough. The issue is probably having the wrong spring in where it goes into the carb. I had to disconnect it from the carb in order to get enough cable slack to let me hook stuff up on the bars. This involved taking a plunger slide thing off the end of the cable that held on a spring.

Now, I try to be careful while doing this stuff. I had my trusty, red lunch tray, from the school that I used to go to, nearby to hold parts and tools so they wouldn't get lost under the stove or couch (I'm working in my not tiny, but not huge, apartment's living room/kitchen area) and I was pretty sure all the stuff was going safely on my lunch tray. Slightly surprisingly, when it came time to put it all back together, I couldn't find the spring. I searched all over and found something that looked about right in my tin of spare screws and bits. It was kind of strange because I wouldn't want that sort of thing to go in that sort of tin. I shrugged like Mariah Carey and put the spring on the end of the choke cable and buttoned everything back up. While checking my work, I found that the lever wasn't really moving very smoothly. I chalked this up to the machine being a bit older and generally haggard.
Fast forward (does anyone even know what that means anymore or is that phrase too analog? I think I'm getting old) to this morning while I'm making some tea and I feel something underfoot. Nope, not a dried up piece of something cooked yesterday, but a wayward spring! Mystery solved! I'm astounded it wasn't eaten by the cat or lost forever underneath an appliance or piece of furniture.

So now, I have a bit of minor choke fiddling to do, and hopefully it'll operate a bit smoother, but probably not. After that, I plan to get some new pads in the rear wheel. Hopefully, the battle with the spring will be shorter and there will be no casualties. I do have a decent cable on the rear brake, so I've got that going for me.

Speaking of casualties, I have to remember to pick up a couple cotter pins for the wheel nuts. All the good mechanics say that you shouldn't reuse cotter pins and while I half ass a lot of things, having the wheels fall off is something I'd really love to avoid.

Jan 4, 2017

Well, Here We Are

I love things with wheels, especially bikes. I love to work on them. This blog is where I'm going to record what I do to my bikes. If you follow along hopefully you can laugh with me and learn a thing or two, or at least laugh at me.

My current project is something new for me because I have only worked on pedal bikes up to this point. I bought a moped... noped... scooter thing on craigslist. It's a 1980 Honda Express NC-50. A little 50cc 2 stroke scooter. When I bought it, the ad made it sound like it didn't need much work to get going, but I should have known otherwise because, ya know, craigslist.

I got a rolling heap and a grain sack of parts. At least it was cheap.

Every time I fix one thing on it, I find something new wrong with it. The piston rings fell out in pieces when I went in to put a new head gasket. When I went to clean the carb, I found aluminum shavings in the reeds. The carb was also missing a bunch of stuff too. In hindsight, it might have been better to buy a new carb. The oil injector was also missing parts. The muffler had some horrible weld job and couldn't be attached to the bike. The gas tank was full of rust and while cleaning it, I found that the window to look at the oil level leaked. It had the wrong spark plug installed. The brakes did slightly more than nothing. But it was cheap, and I wanted a project with a motor, so here we are.

So far, things I've done:
new piston rings
new cylinder and head gasket
cleaned and adjusted (correctly?) the points
new ignition coil and condenser
new spark plug and wire
added the missing parts to the carb
hooked up throttle (it didn't come with a cable)
mostly cleaned and patched the tank
sourced and installed the missing oil injection parts
ran gas/oil lines with filters
puchased and installed an exhaust/gasket

Things I need to do:
run wiring (the old wiring harnesss was melted together by someone's welding)
put in new brake pads front and rear
hook up the front brake with a new cable
put on front and rear lights
hook up the choke
Get a Helmet (it's the law here)

Things I should probably do:
New tires/tubes
Register/insure the bike
Make the turn signals work
Change the fluid in the case thing where the centrifugal clutch lives
Make the seat less likely to fall off/fall apart

Things that concern me:
crank/piston pin/bearings
piston ring size
The wind up starter. Some honda express models use this wind up rachet mechanism instead of a kickstarter and they are known to fail. I'm quite sure some jerk on the street
Where am I going to store this thing?
Is anyone going to buy this from me when I want to get something bigger/better?
I didn't put in that oil seal when I put the new rings on... I think I should do that.
Spark plug boot and wire are very chewed up because of a previous roommate's cat.
How much I've spent on parts, part of me wants to know, most of me is scared to know

Things that don't concern me:
Speedometer, I don't think this thing is going to go fast enough for that to matter. Hell, it doesn't go at all right now.
Haggard paint
Lack of fenders
Running this thing without a battery
the lack of key ignition situation (it's not like I just don't have a key, it's that there's no place I could put one if I did have one)

I've got a lot of work to go and this should be interesting so come back for more. Maybe subscribe or something. Shout out to all the Honda Express riders out there!